Fallout 4 How To Fix It!
Is Fallout 4 giving you a headache...try this things !
While Fallout 4 was released in 2015 ,followed with couple of updates and fixes ...still the game doesn't look right if we don't take things in our hands. Yes this game is good but far from excellent followed with many issues which will be covered in this guide. This guide follows a simple explanation and fixes you might be looking for from changing the FOV ,unlocking the FPS ,removing mouse acceleration and more.
1. Change FIELD OF VIEW (FOV)
fDefault1stPersonFOV=YY
XX is you desired FOV in third person
YY is the desired FOV in first person
90 is probably the best option.
fDefault1stPersonFOV=YY
XX is you desired FOV in third person
YY is the desired FOV in first person
90 is probably the best option.
- Go to Fallout.ini (usually located C:\Users\[name]\Documents\My Games\Fallout4\)
- Under [Display] add
fDefault1stPersonFOV=YY
XX is you desired FOV in third person
YY is the desired FOV in first person
90 is probably the best option.
- Next go in to the root of the Fallout 4 game in Steam (usually located steamapps\common\Fallout 4\Fallout4) and find Fallout4Prefs.ini
- Under [Display] add
fDefault1stPersonFOV=YY
XX is you desired FOV in third person
YY is the desired FOV in first person
90 is probably the best option.
Example:
- To change FOV for gun model and pipboy (in case they are small) follow this steps
2. Unlock FPS lock ( Frame Rate) ,possible fix for microstutter
To unlock frame rate open Fallout4Pref.ini (usually located at C:\Users\[name]\Documents\My Games\Fallout4\).
[edit: another possibly simpler solution that may work for you is to play in a bordeless window mode.]
3. Fix Mouse Smoothing
- Search for the line iPresentInterval=1, and change it to iPresentInterval=0
[edit: another possibly simpler solution that may work for you is to play in a bordeless window mode.]
3. Fix Mouse Smoothing
Mouse smoothing is present by default in Fallout 4. To remove it we simply open Fallout4.ini (C:\Users\[name]\Documents\My Games\Fallout4\) and under [Controls] add:
4. Vertical and Horizontal Mouse Movement Different
- bMouseAcceleration=0
- bMouseAcceleration=0
4. Vertical and Horizontal Mouse Movement Different
If you do not like that the horizontal and vertical mouse movement is different in Fallout 4 there is a quick and easy way to fix it. Simply open Fallout4.ini (located in C:\Users\[name]\Documents\My Games\Fallout4\) and change the below:
.03738 if you have a 16:9 monitor.
.042 if you have a 21:9 monitor.
.028 if you have a 4:3 monitor.
.0336 if you have a 16:10 monitor.
For any other aspect ratio, simply multiply your aspect ratio by .021.
5. How to change ADS (aiming down the sites) sensitivity
- fMouseHeadingYScale=.021
- fMouseHeadingYScale=XXXX
.03738 if you have a 16:9 monitor.
.042 if you have a 21:9 monitor.
.028 if you have a 4:3 monitor.
.0336 if you have a 16:10 monitor.
For any other aspect ratio, simply multiply your aspect ratio by .021.
5. How to change ADS (aiming down the sites) sensitivity
To change your sensitivity when you are aiming down sites in game (ads) firstly open Falout4Prefs.ini (loacted at C:\Users\[name]\Documents\My Games\Fallout4\) and under [Main] put the below:
If you are playing in 16:9 the value you want to put for XX.XX is: 2.136363636
I have not yet confirmed that this is the rate number for other aspect ratios.
Next do the same for the Fallout4Prefs.ini which is located where you installed steam then open steamapps\common\Fallout 4\Fallout 4
6. Remove controller acceleration
- fIronSightsFOVRotateMult=X.XX
If you are playing in 16:9 the value you want to put for XX.XX is: 2.136363636
I have not yet confirmed that this is the rate number for other aspect ratios.
Next do the same for the Fallout4Prefs.ini which is located where you installed steam then open steamapps\common\Fallout 4\Fallout 4
6. Remove controller acceleration
Removing controller acceleration is simple enough .go to your Fallout4.ini (located in C:\Users\[name]\Documents\My Games\Fallout4\), then scroll down to [Controls] and add the below:
fMouseHeadingXScale=.0125fMouseHeadingYScale=.02225
fLookGraphY4=0.1000
fLookGraphX4=0.1000
fLookGraphY3=0.1000
fLookGraphX3=0.1000
fLookGraphY2=0.1000
fLookGraphX2=0.1000
fLookGraphY1=0.1000
fLookGraphX1=0.1000
iNumLookGraphSettings=4
fMoveGraphY3=0.1000
fMoveGraphX3=0.1000
fMoveGraphY2=0.1000
fMoveGraphX2=0.1000
fMoveGraphY1=0.1000
fMoveGraphX1=0.1000
iNumMoveGraphSettings=3
fHeadingAxisDeadzone=0.0000
fMovementAxisDeadzone=0.0000
fMaxLookRampUpDelta=0.1300
fMaxMoveRampDownDelta=500.0000
fFreezeDirectionDefaultSpeedThreshold=100.0000
fFreezeDirectionDefaultAngleThreshold=100.0000
bFreezeDirectionOnLargeDelta=1
7. Add 21:9 (ultrawide) support
To have this game run in 21:9 without issue simply open Fallout4Prefs.ini in your documents (C:\Users\[name]\Documents\My Games\Fallout4\), and change the following lines to how they are below:
For borderless windowed mode:
bTopMostWindow=1
bMaximizeWindow=1
bBorderless=1
bFull Screen=0
iSize H=XXXX
iSize W=YYYY
Where XXXX is whatever your vertical resolution is aand YYYY is whatever your horizontal resolution is.
For fullscreen mode:
bTopMostWindow=0
bMaximizeWindow=0
bBorderless=0
bFull Screen=1
iSize H=1080
iSize W=2560
Where XXXX is whatever your vertical resolution is aand YYYY is whatever your horizontal resolution is.
Next do the same for the second Fallout4Prefs.ini located in wherever you insalled steam then steamapps\common\Fallout 4\Fallout 4.
Currently the hud will stretch, another person is likely to soon to release a fix for the hud.
If you are finding your image has this odd dark rectangle bug in your Fallout4Pref.ini file change:
bComputeShaderDeferredTiledLighting=1
to
bComputeShaderDeferredTiledLighting=0
Note : You can use the same setting/tweak for 4:3 support
8. Skip intro when loading game.
For borderless windowed mode:
bTopMostWindow=1
bMaximizeWindow=1
bBorderless=1
bFull Screen=0
iSize H=XXXX
iSize W=YYYY
Where XXXX is whatever your vertical resolution is aand YYYY is whatever your horizontal resolution is.
For fullscreen mode:
bTopMostWindow=0
bMaximizeWindow=0
bBorderless=0
bFull Screen=1
iSize H=1080
iSize W=2560
Where XXXX is whatever your vertical resolution is aand YYYY is whatever your horizontal resolution is.
Next do the same for the second Fallout4Prefs.ini located in wherever you insalled steam then steamapps\common\Fallout 4\Fallout 4.
Currently the hud will stretch, another person is likely to soon to release a fix for the hud.
If you are finding your image has this odd dark rectangle bug in your Fallout4Pref.ini file change:
bComputeShaderDeferredTiledLighting=1
to
bComputeShaderDeferredTiledLighting=0
8. Skip intro when loading game.
Go to C:\Users\[name]\Documents\My Games\Fallout4\ and open up Fallout4.ini and under [General] add:
- SIntroSequence=0
- fChancesToPlayAlternateIntro=0
- uMainMenuDelayBeforeAllowSkip=0
Skipping the game launcher is simple process. Go to where you installed Fallout 4 (usually located steamapps\common\Fallout 4\). When in this folder you should see several files and folders. One should be called Fallout4.exe and another Fallout4Launcher.exe
Change Fallout4Launcher.exe to Fallout4LauncherOriginal.exe (it can be renamed to anything but I feel this make it clear).
Next rename Fallout4.exe to Fallout4Launcher.exe
Now whenever you click play in Steam your game will go straight into the game and skip the launcher.
10. MOSUE NOT VISIBLE AT MENU
The most common solution to this is if you have a gamepade plugged in is to unplug it., If you know you don't want to use a gamepad and don't want to unplug your controller everytime you load up the game the below will help. Likewise if you don't have a controller plugged in and have no cursor at the menu the game may think you do so disabling controller as below will help.
To solve this simply open Fallout4Prefs.ini (located in C:\Users\[name]\Documents\My Games\Fallout4\), then scroll down to:
bGamepadEnable=1
and change it to:
bGamepadEnable=0
11. SLI Support
This fix may not work for everyone, so you may wish to look at others solutions to see if they work for you if this doesn't.
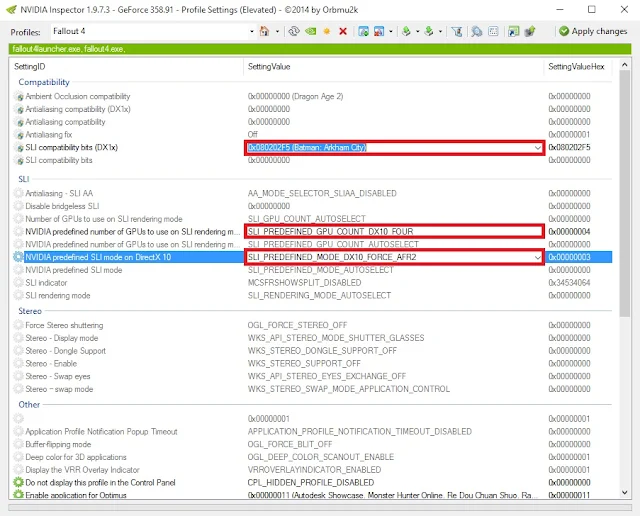
Unfortunately SLI support is no where to be seen by default in Fallout 4. Thankfuly there is a work around, firstly you will need to download Nvidia inspector. Which you can get from here.
Once you have nvidia inspect open the program and click on settings by the Driver version description marked with red.
Next in search find Fallout 4
Change the following as shown in the red boxes
12. Invisible Lockpicking Bug
If you are having the invisible lockpicking bug the solution is quite simple, open Fallout4Prefs.ini in your documents (C:\Users\[name]\Documents\My Games\Fallout4\) and under [Display] change:
For example:
Next do the some for the second Fallout4Prefs.ini located in wherever you installed steam then steamapps\common\Fallout 4\Fallout 4.
This is a bug that seems to be quite common if you unlock the frame rate and do not vsync it.
Lockpicking Fix for 5:4 screens:
To solve this simply open Fallout4Prefs.ini (located in C:\Users\[name]\Documents\My Games\Fallout4\), then scroll down to:
bGamepadEnable=1
and change it to:
bGamepadEnable=0
11. SLI Support
This fix may not work for everyone, so you may wish to look at others solutions to see if they work for you if this doesn't.
Unfortunately SLI support is no where to be seen by default in Fallout 4. Thankfuly there is a work around, firstly you will need to download Nvidia inspector. Which you can get from here.
Once you have nvidia inspect open the program and click on settings by the Driver version description marked with red.
 |
| Nvidia Inspector |
 |
| Nvidia searchbox |
Change the following as shown in the red boxes
 |
| Nvidia settings |
If you are having the invisible lockpicking bug the solution is quite simple, open Fallout4Prefs.ini in your documents (C:\Users\[name]\Documents\My Games\Fallout4\) and under [Display] change:
- iSize W=XXXX
- iSize H=YYYY
- iSize W=XXXX-1
- iSize H=YYYY-1
For example:
- iSize W=1920
- iSize H=1080
- iSize W=1919
- iSize H= 1079
Next do the some for the second Fallout4Prefs.ini located in wherever you installed steam then steamapps\common\Fallout 4\Fallout 4.
This is a bug that seems to be quite common if you unlock the frame rate and do not vsync it.
Lockpicking Fix for 5:4 screens:
First ser your resolution as per normal and next open your Fallout4.ini file (located in C:\Users\[name]\Documents\My Games\Fallout4\) and under [Interface] add:
fLockPositionY=100.0000
To fix issues related to Power Armor at this resolution in the same file as before and under [Interface} again add:
fUIPowerArmorGeometry_TranslateZ=-18.5000
fUIPowerArmorGeometry_TranslateY=460.0000
13. Remove Depth of Field
To remove depth of field, load up the Fallout4Prefs.ini (located in C:\Users\[name]\Documents\My Games\Fallout4\) and under [Imagespace] change:
- bDoDepthOfField=1
- bScreenSpaceBokeh=1
- bDoDepthOfField=0
- bScreenSpaceBokeh=0
Examples:
OFF
 |
| Fallout 4 FOD OFF |


No comments